Nyko Gameface 360: Make your own faceplates
Check it out
Ever since I read about this item, I had to have it. Since my other option isn't yet available.
I've not had a chance to give my 360 a small photoshoot yet. I procured an unused window static cling advertisement for the AVP movie. It happened to be exactly the right height for the 360, and I cut it in half so an Alien was on one side and a Predator was on the other. From there, I added an AVP background for my 360 dashboard. The only thing missing was an Alien or AVP themed faceplate.
I've been hoping that the Giger 3D faceplate would happen soon (in black), but it doesn't appear to be doing so. Then I found this neat personalization tool from Nyko, which happens to cost the same amount as an OEM 360 faceplate. What a deal.
The rear piece of the faceplate is an "off-silver" color as I'll call it. Putting on the Gameface without even inserting a picture looks pretty good in its own right. They even chromed the power button, although they failed to chrome the memory doors, wireless button, and USB door (which would have been the perfect touch).
The kit comes with 15 blanks, and 5 pre-printed inserts. The pre-prints leave much to be desired, so you'd better have a quality color inkjet (or laserjet if you have access to one). You could use black and white, but in my case that would look dull and not fit the theme. I had a good color printer at work, so I moved on to the next task.
Unfortunately, the software for the kit isn't included. You must download it from nyko.com. The software is almost 5MB uncompressed, so it shouldn't take long unless you are misfortuned by slow dialup. After uncompressing the software, it's good to find that no installation is required; it's a self-contained executable file. A Mac version is also available.

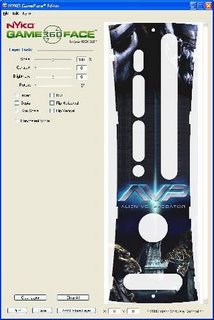
The software itself is fairly simple and self-explanatory. There are sliders for the usual fair: scale, contrast, brightness, rotation. There are check boxes to flip the current image layer and also to add basic effects. Consider it a Paint Shop Pro Super Light Edition of sorts. Anyway, you can add a bunch of pictures which each count as their own layer which you can move around and place it over the faceplate diagram. Easy as pie, the layer limit is really high.
In my case, I had to open a picture editor and edit my pictures together so it looked a bit more natural (I could have done better, but it was late).
From there, I lined everything up, and printed. The program is even nice enough to remind you to set your printing preferences to LEGAL (8 x 14) size before you print. Insert you blank into the printer and you can get moving.
One thing to note in the instructions is you should print on a normal piece of paper first. You may want to mark the paper for your reference before printing. Take note of where the printer prints and what it prints first. Using this information, you can decide which direction to insert the faceplate blank.
I'm happy with the results, and I can't wait to put the insert on my 360. It will complete the look I've been wanting. I will probably have to still the memory card doors and wireless sync button from my old black faceplate to complete the look.
The good:
- Any design you want
- Decent software
- Plenty of blanks included
The bad:
- Base of faceplate could have had chrome doors and wireless button
- Faceplate inserts have slits in them to fit the contours of the base
- Software has to be downloaded
I won't do "the ugly", because that would be lame. Anyway, this item is perfect for those who just can't seem to find a fitting OEM or 3rd party static faceplate. It's even better for those who don't want to pay for a faceplate skin or to have someone custom airbrush their faceplate. It's cheap, looks pretty good, and easy to use.
Thank you, Nyko!


0 Comments:
Post a Comment
<< Home